
MIM Injection Molding: Mold Filling, Green Part Control, and Trial Validation
MIM injection molding is the forming stage where metal powder-binder feedstock is plasticized, injected, packed, cooled, and released from the mold as a green part. The purpose of this stage is not only to fill the cavity. It is to create a repeatable molded output with stable shape, controlled filling, acceptable gate and parting-line condition, and enough green strength for handling before debinding.
This page focuses on the injection-molding stage inside the full MIM process. Feedstock formulation belongs to the dedicated MIM feedstock guide, detailed defect diagnosis belongs to the MIM molding defects guide, and downstream binder removal and densification are covered by the debinding and sintering pages.
MIM Injection Molding in One Engineering View
The injection stage should be judged by whether the feedstock can fill and pack the cavity repeatedly, whether the green part can release without damage, and whether the molded output is stable enough to enter debinding. A part that looks complete after ejection may still contain a flow imbalance, a weak weld area, local density variation, excessive flash, or handling damage.
The correct engineering question is therefore not only “Can the cavity be filled?” It is “Can filling, packing, cooling, ejection, degating, inspection, and transfer be repeated under a controlled process window?” This page owns that forming-stage decision. Detailed defect troubleshooting and downstream debinding or sintering control are handled in their dedicated pages.
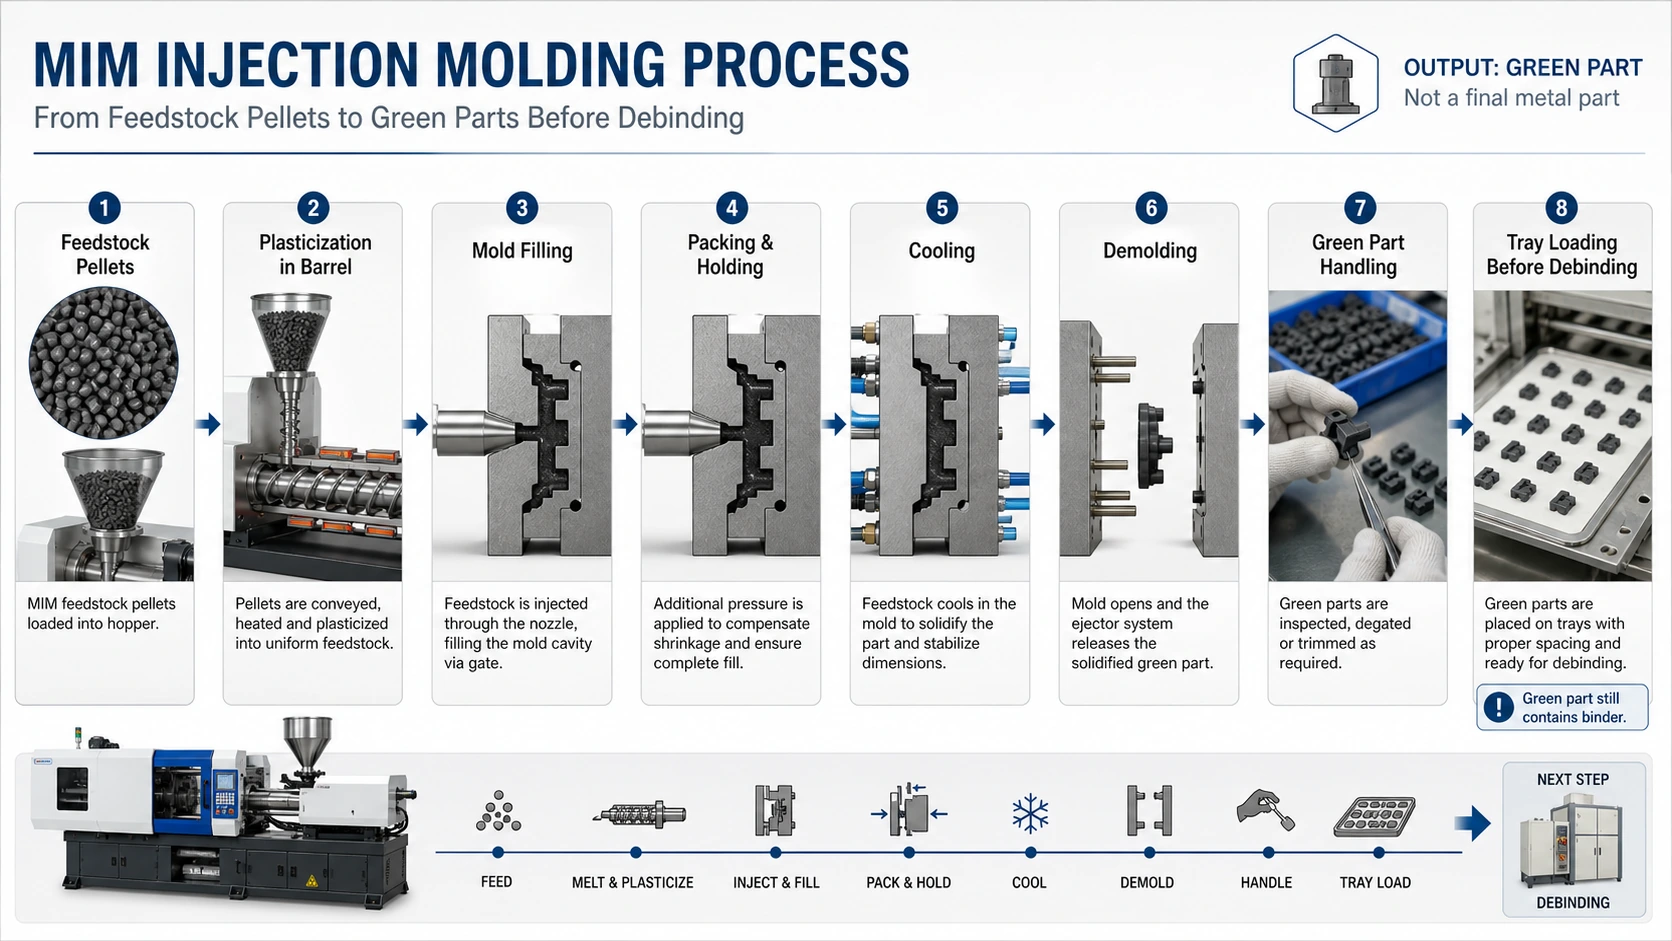
MIM injection molding is a controlled green-part formation stage: plasticize, fill, pack, cool, release, inspect, and transfer.
| Injection-Stage Control Point | Release Question |
|---|---|
| Feedstock input condition | Is the prepared feedstock stable enough for repeatable plasticization and filling? |
| Mold filling | Does the cavity fill without short shot, severe weld-line, air-trap, or separation risk? |
| Packing and holding | Is the molded output stable without progressive flash, void, or local density imbalance? |
| Cooling and ejection | Can the green part release without cracking, bending, ejector damage, or protected-surface marks? |
| Degating and handling | Can the part be trimmed, inspected, and loaded without damaging fragile features? |
| Process handoff | Are the green-part condition, loading orientation, and trial records suitable for downstream validation? |
What Is Injection Molding in the MIM Process?
Injection molding is the forming stage in metal injection molding. Prepared metal powder-binder feedstock is plasticized in the machine, injected through the nozzle, runner, and gate, packed inside the cavity, cooled, and ejected as a green part.
The injection stage ends when the molded output has been released, checked, and prepared for transfer—not when the final metal part is complete. Final density and dimensions are created later during MIM sintering, so molding approval must eventually be confirmed against downstream sample results rather than green appearance alone.
Why MIM Injection Molding Is Different from Plastic Injection Molding
MIM uses injection-molding equipment, but it does not produce a finished part at ejection. The material is a highly filled metal powder-binder feedstock, and the molded output is a fragile green part that still requires debinding and sintering.

The equipment may look familiar, but material behavior, release strength, defect consequences, and downstream validation are different.
| Review Point | Plastic Injection Molding | MIM Injection Molding |
|---|---|---|
| Molded output | Usually a functional polymer part after cooling and ejection | A green part containing metal powder and temporary binder |
| Flow behavior | Controlled primarily as a polymer melt | Affected by high powder loading, shear, and powder-binder uniformity |
| Release and handling | Part strength is normally close to the final polymer condition | Green strength is limited; ejection, degating, and tray loading can create later defects |
| Final validation | Often completed after molding and secondary finishing | Must continue through debinding, sintering, dimensional inspection, and any required finishing |
This difference is why MIM settings cannot be copied blindly from plastic molding or another MIM part. The process window must be developed for the actual feedstock, geometry, gate, mold, and release condition.
Feedstock Input Conditions Required Before MIM Injection Molding
Feedstock formulation, binder-system selection, solid loading, and material development belong to the dedicated MIM feedstock section. For injection molding, the narrower concern is whether the prepared batch enters the machine in a stable and traceable condition.
Confirm the intended material batch, pellet condition, storage status, and absence of visible contamination before machine setup.
The feedstock should plasticize within a controlled window without cold delivery, degradation, or unstable feeding.
The mixture must remain sufficiently uniform through feeding, screw shear, nozzle delivery, cavity filling, and packing.
Parameter adjustment cannot permanently correct an unstable material input. When filling behavior changes unexpectedly, the review should separate feedstock-condition risk from machine, mold, gate, venting, and geometry risk before settings are repeatedly changed.
Step-by-Step MIM Injection Molding Workflow
The MIM injection molding workflow should be controlled as a process chain. Each step influences the next one, and each early-stage mistake can affect debinding, sintering, and final inspection.

MIM molding quality depends on how uniformly the feedstock is plasticized, injected, and packed inside the mold cavity.
Feedstock pellets are fed into the hopper, heated and sheared in the barrel, pushed through the nozzle, and injected into the mold cavity through the runner and gate. Poor control in this zone may cause short shots, weld lines, binder separation, black lines, air traps, or green density variation.
Feedstock Feeding
The feedstock pellets are loaded into the hopper of the injection molding machine. At this stage, storage and feeding control matter. Contaminated or moisture-affected feedstock can create molding instability before the actual injection cycle begins.
Plasticization in the Barrel
Inside the barrel, the feedstock is heated and sheared by the screw. The binder phase softens and allows the powder-binder mixture to flow. The goal is not simply to melt the binder. The goal is to create a homogeneous, moldable state without overheating, degradation, or powder-binder separation.
Injection and Mold Filling
During injection, the plasticized feedstock is forced through the nozzle, runner system, gate, and finally into the mold cavity. This is where many MIM defects are created.
A good filling pattern should avoid excessive shear, trapped air, severe weld lines, and sudden flow hesitation. For small precision parts, gate location and flow path are often as important as machine settings.
Packing and Holding
After the cavity is filled, holding pressure is used to compensate for shrinkage during cooling and to stabilize green density. In MIM, packing affects more than surface sink marks. It can influence local powder concentration and final sintering behavior.
Cooling and Solidification
Cooling stabilizes the green part enough for mold opening and ejection. Cooling that is too short may cause deformation during demolding. Cooling that is too long reduces production efficiency and may not solve root design problems.
Demolding from the Mold
Demolding is a risk point in MIM. The green part has shape, but it does not yet have final metal strength. Poor draft angle, weak ejector layout, undercut stress, or an unsuitable tooling scheme can cause cracks, bending, corner damage, or hidden internal weakness. Review these risks with the dedicated MIM mold design guide before tooling release.
Green Part Handling Before Debinding
After demolding, the part enters one of the most underestimated stages: green part handling. The part may require degating, trimming, flash removal, visual checking, tray loading, and controlled transfer before debinding.
Green Part Handling Before Debinding
Green part handling belongs inside the injection molding page because it happens immediately after demolding and before debinding. It protects the molded output of the injection stage.

Green part handling is a real quality-control step, not simple manual transfer.
After injection molding, green parts still contain binder and have limited mechanical strength. Poor handling can create cracks, chipped corners, gate marks, tray dents, or support-related deformation.
Why Green Parts Are Weak After Molding
A green part contains metal powder and binder. It has the shape of the molded component, but it has not been debound or sintered. It is still fragile compared with the final metal part.
This means green part handling must be treated as a controlled manufacturing step, not simple manual work.
Degating, Trimming, and Flash Removal
Degating and trimming can create cracks, broken edges, gate marks, or cosmetic defects if the method is not suitable. Thin ribs, small holes, sharp corners, and exposed functional surfaces are especially sensitive.
A common mistake is to place the gate only for mold filling convenience, without considering how the gate will be removed from a fragile green part. In MIM, gate design must consider filling, packing, trimming, appearance, and final sintered geometry.
Visual Checking Before Debinding
Visual checking before debinding should look for more than obvious surface defects. Operators and quality staff should check cracks near gates, flash on functional surfaces, corner chipping, ejector marks, distortion after demolding, weld line weakness, handling dents, surface contamination, and tray contact risk.
Tray Loading and Part Support
Green part loading before debinding is not only a logistics step. It determines how the part is supported when binder removal begins. Poor tray loading can cause dents from point contact, deformation from unstable orientation, cracks from uneven support, parts touching during binder removal, and distortion that appears after sintering.
| Handling Defect | Typical Cause | Possible Final Result |
|---|---|---|
| Cracks | Excessive trimming force, poor support, rough handling | Sintered cracks or fracture risk |
| Chipped corners | Thin walls, sharp edges, exposed ribs | Cosmetic rejection or dimensional loss |
| Gate marks | Poor degating method or poor gate design | Visible defect or secondary finishing need |
| Tray loading dents | Point contact, stacking pressure, unstable posture | Surface marks or local deformation |
| Debinding support problems | Poor orientation or parts touching each other | Cracking, distortion, or part sticking |
What Is a Green Part in MIM?
A green part is the molded powder-binder body after injection molding and before debinding. It has the intended molded geometry, but it has limited strength, contains temporary binder, and remains oversized relative to the final sintered part.
The cavity, gate, runner, packing, and cooling conditions establish the first physical version of the part.
The part has not reached final density, dimensions, strength, hardness, corrosion behavior, or functional condition.
Complete filling, cracks, flash, gate condition, ejection damage, distortion, and tray orientation should be checked before transfer.
Some molding defects remain subtle until debinding or sintering. For a broader explanation of green, brown, and sintered states, use the relevant process guides rather than expanding the injection page into a complete downstream-process guide.
Key MIM Injection Molding Parameters That Affect Green Part Quality
MIM injection parameters should be developed around part geometry, material behavior, and final quality requirements. They should not be copied blindly from another part.
| Parameter | Main Influence | Common Risk if Poorly Controlled |
|---|---|---|
| Barrel temperature | Feedstock plasticization and flow | Poor filling, degradation, separation |
| Nozzle temperature | Material delivery into mold | Cold slug, flow marks, unstable filling |
| Mold temperature | Surface quality and filling stability | Weld lines, poor surface, dimensional variation |
| Injection speed | Filling pattern and shear | Jetting, trapped air, binder separation |
| Injection pressure | Cavity filling | Flash, stress, short shot, mold wear |
| Holding pressure | Green density and shrinkage control | Voids, sink marks, density imbalance |
| Cooling time | Demolding stability | Warpage, ejector damage, deformation |
| Screw speed and back pressure | Shear, plasticization, and feedstock uniformity | Over-shear, poor mixing, material instability |
Barrel and Nozzle Temperature
Temperature should be high enough for stable flow but not so high that the binder degrades or the powder-binder mixture separates. Overheating may not always create an immediate visual defect, but it can weaken process stability.
Mold Temperature
Mold temperature affects filling, surface quality, weld line formation, and cooling. If mold temperature is too low, the feedstock may freeze early in thin sections. If it is too high, cooling and demolding may become unstable.
Injection Speed and Injection Pressure
Injection speed controls how the cavity fills. Too slow may cause short shots, cold weld lines, or poor surface quality. Too fast may cause jetting, trapped air, or separation. Injection pressure should support complete filling, but pressure alone cannot fix poor gate design, unreasonable wall thickness, or excessive flow length.
Holding Pressure and Holding Time
Holding pressure and time are important for green density stability. If holding is insufficient, voids or low-density zones may remain. If excessive, flash or stress may increase. For precision MIM parts, holding strategy should be validated together with sintered dimensions, not only green part appearance.
Cooling Time and Demolding Stability
Cooling time must give the part enough strength for ejection. A part that is ejected too early may deform or crack. However, long cooling time cannot compensate for poor ejector design or insufficient draft.
Mold Filling and Part Design Factors in MIM Injection Molding
Part geometry controls the flow path, pressure loss, venting demand, weld-line location, cooling balance, and release risk. This page only summarizes the geometry factors that directly affect the injection stage; complete design rules remain in the dedicated design pages.
Review where feedstock enters, how it reaches thin or distant features, where flow fronts meet, and where the gate vestige remains. See MIM gate design.
Long thin paths, sudden section changes, and local heavy masses can create filling or packing imbalance. See the MIM wall thickness guide.
Draft, parting line, slides, core pins, ejector support, and protected surfaces affect green-part release. See MIM mold design.
Injection-stage boundary: A geometry may be fillable but still unsuitable for stable ejection, degating, handling, debinding support, or sintered dimensional control. Tooling release should therefore connect filling analysis with the complete DFM and validation path.
MIM Molding Risk Signals and Defect Diagnosis
The injection page should identify the main release signals, but detailed symptom-by-symptom troubleshooting belongs to the dedicated MIM injection molding defects guide. That child page covers defect causes, process checks, tooling factors, and prevention logic in greater depth.

Use the symptom to start the review, then verify the actual cause through trial records, mold condition, green-part inspection, and downstream feedback.
| Risk Signal | Injection-Stage Review Direction | Release Action |
|---|---|---|
| Short shot or incomplete feature | Check feedstock delivery, temperature, speed, pressure, venting, gate, and flow length. | Do not release until filling is complete and repeatable. |
| Flash or unstable parting-line condition | Check pressure, clamping, mold fit, shut-off, wear, venting, and material behavior. | Confirm the condition is controlled rather than progressively worsening. |
| Weld line, air trap, or visible flow imbalance | Check flow-front meeting location, gate direction, temperature, venting, and feature layout. | Review whether the location affects strength, sealing, appearance, or a critical dimension. |
| Binder-rich line, streak, or suspected separation | Check feedstock condition, shear, temperature, gate restriction, and injection profile. | Hold release until material uniformity and downstream sample results are acceptable. |
| Crack, chip, bend, ejector mark, or gate-removal damage | Check draft, ejection support, cooling, green strength, degating method, and handling. | Correct the release or handling method before the batch enters debinding. |
For full failure-cause-prevention logic, use the molding defects diagnosis page rather than expanding this parent process page with duplicate defect sections.
Downstream Process Handoff: What Injection Molding Must Deliver
Injection molding does not own debinding or sintering control, but it must deliver a green part that is suitable for those stages. The handoff should include an acceptable molded condition, controlled handling and support, traceable trial settings, and clear feedback points for downstream validation.

A green part may pass visual inspection and still require downstream validation for shrinkage, distortion, density, dimensions, or structural integrity.
Use the dedicated MIM debinding and MIM sintering pages for downstream process control. On this page, the ranking and engineering role is limited to defining what the injection stage must release and what feedback must return to molding.
Engineering Checks Before MIM Injection Molding Trial
Before trial molding, the engineering team should define the injection-stage risks, inspection points, record requirements, and downstream feedback plan. This pre-trial review is different from final trial release: it prepares the validation method before the first acceptable sample is approved.
| Review Item | What Should Be Checked | Why It Matters |
|---|---|---|
| Drawing and tolerance review | Functional dimensions, datums, cosmetic surfaces, critical tolerances | Prevents unrealistic dimensional expectations after sintering |
| Material and feedstock confirmation | Material grade, feedstock condition, shrinkage behavior, batch control | Improves molding and sintering repeatability |
| Mold filling risk review | Flow length, gate location, wall thickness, air trap, weld line risk | Reduces short shot, weld line weakness, and density imbalance |
| Gate, runner, mold release, and ejection review | Gate location, runner path, degating method, mold release, ejector position, and fragile features | Protects green part integrity after molding |
| Green part inspection plan | Filling, flash, cracks, weld lines, distortion, gate condition, tray loading | Finds problems before debinding and sintering amplify them |
| Trial molding parameter record | Temperature, pressure, speed, holding time, cooling time, observed defects | Makes process improvement traceable instead of guesswork |
| Debinding loading method confirmation | Part orientation, tray support, spacing, contact points | Reduces cracking, distortion, and support-related defects |
For MIM dimensional expectations, project teams often refer to MPIF Standard 35-MIM. However, final tolerance capability should always be confirmed through part-specific DFM review, trial molding, debinding, sintering validation, and inspection reports.
How XTMIM Controls the MIM Injection Molding Stage
XTMIM performs MIM injection molding and green-part production in-house. The practical value is not the machine count alone; it is the ability to connect molding setup, visible green-part condition, handling method, downstream samples, and dimensional feedback inside one production-validation loop.
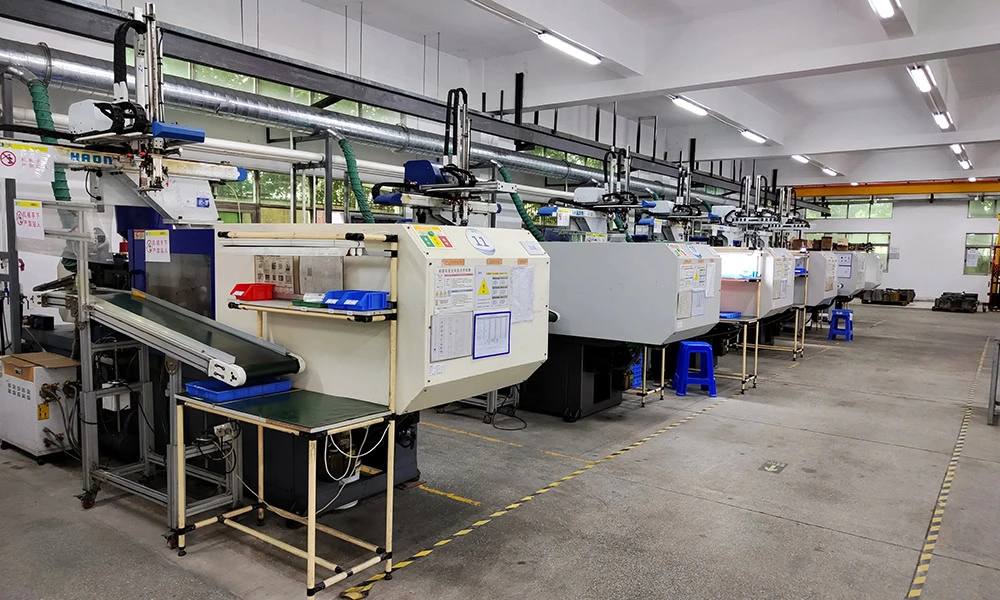
This workshop image supports the process-control discussion below. Injection settings, mold behavior, green-part release, and repeat-cycle observations must be reviewed together during trial molding and production validation.
| Control Area | What Is Reviewed | Useful Project Evidence |
|---|---|---|
| Material and machine preparation | Feedstock identity and condition, machine readiness, barrel and nozzle setup, mold preparation | Material traceability, setup record, approved trial condition |
| Mold filling and packing | Filling completeness, flow balance, pressure response, flash, weld-line and gate-area condition | Trial observations, sample comparison, parameter record |
| Cooling, release, and ejection | Part release, ejector support, deformation, cracks, protected-surface marks, cycle stability | Green-part inspection result and repeat-cycle review |
| Degating and green-part handling | Gate removal, edge protection, tray orientation, contact points, spacing, fragile-feature support | Approved handling method and loading orientation |
| Downstream validation feedback | Debinding damage, sintered distortion, dimensional deviation, defect recurrence, correction direction | Sintered sample inspection and correction feedback |
The broader factory capability is documented on the MIM manufacturing capability page. Tool-development review, in-house trial molding, sample feedback, and correction coordination are covered by MIM tooling support.
Evidence rule: Release decisions should be supported by the actual project drawing, approved material, trial records, green-part checks, downstream samples, and inspection feedback. Generic machine settings or a visually acceptable first shot are not enough.
MIM Injection Trial Release Checklist
A trial should move forward only when the injection-stage output is repeatable and the downstream validation plan is clear. The checklist below is intentionally project-specific: it does not impose one universal numerical window on every material, machine, mold, or geometry.
| Release Check | Evidence to Review | Release Condition |
|---|---|---|
| Complete and repeatable cavity filling | Multiple consecutive cycles, thin and distant features, holes, ribs, slots, and end-of-fill regions | No recurring short shot or unstable fill pattern |
| Stable green-part condition | Shape, visible density consistency where monitored, part weight or other project-defined repeatability indicators | Variation remains inside the project’s approved control method |
| Gate, runner, and parting-line condition | Gate vestige, degating method, flash, parting line, protected surfaces, functional restrictions | No unacceptable mark, damage, or progressive flash condition |
| Release and ejection stability | Draft, ejector marks, cracking, bending, sticking, fragile-feature support, mold-release consistency | Green parts release repeatedly without unacceptable damage |
| Green-part handling and tray orientation | Degating support, edge protection, contact points, spacing, stacking, and transfer method | Approved handling method protects the part before debinding |
| Parameter and defect traceability | Material batch, machine and mold identification, temperature, speed, pressure, holding, cooling, observed defects, corrective action | The approved condition can be reproduced and compared |
| Debinding and sintering feedback | Cracks, blistering, deformation, shrinkage behavior, density, surface, and structural condition as applicable | No unresolved downstream failure linked to the molded condition |
| Sintered dimensional and functional review | Critical dimensions, datums, flatness, position, assembly, cosmetic and functional requirements | Results support release, tooling correction, process correction, or an agreed next validation step |
| Final release decision | Engineering, quality, tooling, production, and customer requirements as applicable | The next action is documented: release, controlled trial extension, process adjustment, tooling correction, or design review |
Do not release a MIM injection process from one visually acceptable green part. Approval should be based on repeatability and on the downstream evidence needed for the actual drawing and application.
Representative Engineering Scenario: Handling Damage Appears After Sintering
A representative small stainless-steel MIM part includes a thin side rib and a visible exterior surface. Initial green parts appear complete after ejection, but later sintered samples show corner chips and shallow surface dents.
The review should not assume that sintering created the defect. In this scenario, the more likely process chain is insufficient support during manual gate removal combined with tray contact on a thin exterior edge. Minor green-stage damage becomes easier to see after shrinkage and finishing.
Corrective actions may include supporting the part during degating, removing direct pressure from the rib, changing tray orientation and contact points, adding a defined green-part check, and reviewing whether gate location or mold release should change during the next tooling correction.
Why this matters: This is a representative engineering scenario, not a named customer case. It illustrates why molding release, degating, handling, and downstream feedback must be reviewed as one validation loop.
Review Injection-Molding Risk Before Tooling Release
Submit the 2D drawing, 3D model, material requirement, annual volume, critical dimensions, cosmetic or functional surfaces, and any previous molding or sintering defect information. The review can connect geometry, gate strategy, mold release, green-part handling, and the required validation path before tooling cost is committed.
Submit Your Drawing for MIM ReviewStandard and Engineering Notes
MIM injection molding parameters, shrinkage, green density, and final tolerance capability depend on material system, powder loading, binder system, part geometry, mold design, debinding method, and sintering cycle.
For design and tolerance expectations, engineers may refer to sources such as MPIF Standard 35-MIM and supplier-specific material data. However, final tolerance capability should be confirmed through project-specific DFM review, trial molding, debinding, sintering validation, and inspection reports.
Do not apply one universal parameter window to all MIM materials and geometries. Injection molding conditions should be developed and validated for the actual part.
FAQ About MIM Injection Molding
What is MIM injection molding?
MIM injection molding is the forming stage where metal powder-binder feedstock is heated, plasticized, and injected into a mold cavity to create a green part. The green part has the required geometry but still contains binder and must go through debinding and sintering before becoming a final metal component.
Is MIM injection molding the same as plastic injection molding?
No. MIM uses injection molding equipment and similar forming principles, but the material is a metal powder-binder feedstock. The molded part is only an intermediate green part. It must later be debound and sintered to achieve final metal density and properties.
What is a green part in MIM?
A green part is the molded part after injection molding and before debinding. It contains metal powder and binder, has limited strength, and is larger than the final sintered part due to later shrinkage.
Why does green part quality matter?
Green part quality affects debinding, sintering shrinkage, dimensional stability, surface quality, and final part strength. Cracks, density variation, binder separation, poor gate removal, or handling damage at the green stage can become final defects after sintering.
What are common MIM injection molding defects?
Common injection-stage risk signals include short shot, flash, weld lines, air traps, suspected binder separation, cracks, ejection damage, gate-removal damage, and unstable green-part shape. Detailed cause-and-prevention logic belongs to the dedicated MIM injection molding defects guide.
Can injection molding parameters affect final MIM part dimensions?
Yes. Injection molding parameters can affect green density, packing, internal stress, and defect formation. These conditions influence sintering shrinkage and final dimensional stability.
Why is green part handling included in injection molding?
Green part handling happens after demolding and before debinding. It includes degating, trimming, visual checking, tray loading, and support control. Since the green part is still weak, poor handling can create defects that appear later after debinding or sintering.
When should I request DFM review before MIM tooling?
You should request DFM review before tooling if your part has thin walls, long flow paths, tight tolerances, small ribs, sharp edges, cosmetic surfaces, complex undercuts, or previous molding and sintering defects.